Sony SATA HW Root: Difference between revisions
m Zenofex moved page Sony SATA HW Root (Gen 1) to Sony SATA HW Root |
|||
| (2 intermediate revisions by one other user not shown) | |||
| Line 7: | Line 7: | ||
* This will definitely void your warranty with Sony, if you want to keep your warranty please do not do any of the steps in this guide. | * This will definitely void your warranty with Sony, if you want to keep your warranty please do not do any of the steps in this guide. | ||
* This will wipe your entire system, removing all apps, personal settings and resetting the GTV to factory settings. | * This will wipe your entire system, removing all apps, personal settings and resetting the GTV to factory settings. | ||
* This | * This will probably brick your GTV. | ||
* This will | * This will probably brick your GTV (redundancy). | ||
== Tools Needed == | == Tools Needed == | ||
| Line 47: | Line 47: | ||
Now, connect the hard disk back to the Google TV, and provide power externally. If you can find 5/12V on the mainboard - you can use it, however it was easier to use an external power source. For saftey, ensure you tie the grounds together. | Now, connect the hard disk back to the Google TV, and provide power externally. If you can find 5/12V on the mainboard - you can use it, however it was easier to use an external power source. For saftey, ensure you tie the grounds together. | ||
Once connected back, power on the hard disk, then power on the Google TV. Make sure to connect to the UART onboard so that you can monitor boot output. If all is done correctly, you should see your drive show up under "SATA 0". | Once connected back, power on the hard disk, then power on the Google TV. Make sure to connect to the UART onboard so that you can monitor boot output. If all is done correctly, you should see your drive show up under "SATA 0" (per line 11 of the image below). | ||
From here, boot into recovery - install any update you wish. If you would like to root, pull the drive out, modify "default.prop" in partition1, setting ro.secure=0, and ro.debuggable=1. | From here, boot into recovery - install any update you wish. If you would like to root, pull the drive out, modify "default.prop" in partition1, setting ro.secure=0, and ro.debuggable=1. | ||
Latest revision as of 11:45, 6 January 2013
Error creating thumbnail: Unable to save thumbnail to destination
Warnings
- This will definitely void your warranty with Sony, if you want to keep your warranty please do not do any of the steps in this guide.
- This will wipe your entire system, removing all apps, personal settings and resetting the GTV to factory settings.
- This will probably brick your GTV.
- This will probably brick your GTV (redundancy).
Tools Needed
- 1 Soldering Iron
- Solder
- Flux
- SATA Cable
Theory
Upon initial examination, the Gen 1 Sony Google TV devices have what amounts to a SSD onboard. Specifically, the TDK GBDriver RS2, which is a SATA -> NAND Flash controller. The RS2 has additional features, such as hardware crypto, ATA locking and the like. We will not be attacking this, but we will be simply disconnecting it. By disconnecting the SSD, we can then insert our own drive in the SSD's place, and use it as we wish.
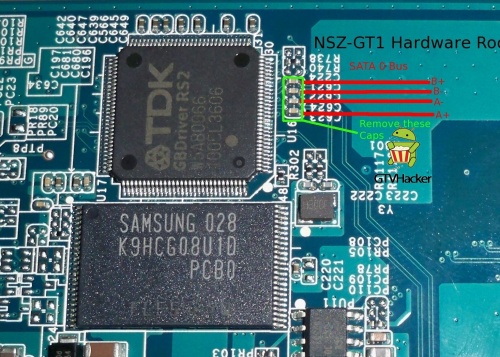
However, since the SATA bus is onboard, it is never brought out to a cable, so surface mount soldering will be required, to surface mount components.
Procedure

Go over the picture. Review the picture. If there are any doubts, please don't try this.
Again, this is surface mount soldering, if you feel uncomfortable - turn away, there is a very high likelyhood that you will brick your box.
If you mess up the pads, you will need to cut the traces, and solder to those, or worse!
To start, remove the mainboard, flip it over and remove the 4 surface mount capacators, which are used to filter out interference. Next, cut off one end of your SATA cable, match the pins (each cable may be different), so A+ -> A+, A- -> A- etc and solder to the right side of the board (as noted in the picture).
You can attempt to solder the cable directly to the right side of the pads, but there may be problems - so including the surface mount caps is advised if possible.
Once you have soldered the SATA connector on, you can reassemble part of your system, insulate the solder joints, be careful of the cable (you can quickly damage the pads), and re-install the heatsink and BD Drive.
Note: In the case of the Gen 1 TV's, there is no BD drive - so you can ignore that part.
Connect the hard disk you intend to use to a computer, ideally a Linux system.
Create 6 partitions, each at least 1GB. At minimum, a 20GB SATA Hard Disk can be used, making each partition around 2-3 GB each. Format these parttions EXT3.
Now, connect the hard disk back to the Google TV, and provide power externally. If you can find 5/12V on the mainboard - you can use it, however it was easier to use an external power source. For saftey, ensure you tie the grounds together.
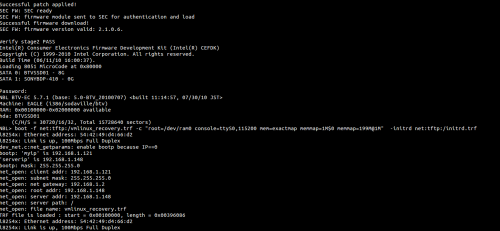
Once connected back, power on the hard disk, then power on the Google TV. Make sure to connect to the UART onboard so that you can monitor boot output. If all is done correctly, you should see your drive show up under "SATA 0" (per line 11 of the image below).
From here, boot into recovery - install any update you wish. If you would like to root, pull the drive out, modify "default.prop" in partition1, setting ro.secure=0, and ro.debuggable=1.
